tecznotes
Michal Migurski's notebook, listening post, and soapbox. Subscribe to ![]() this blog.
Check out the rest of my site as well.
this blog.
Check out the rest of my site as well.
Jun 20, 2013 5:27am
disposable development boxes: linux containers on virtualbox
Hey look, a month went by and I stopped blogging because I have a new job. Great.
One of my responsibilities is keeping an eye on our sprawling Github account, currently at 326 repositories and 151 members. The current fellows are working on a huge number of projects and I frequently need to be able to quickly install, test and run projects with a weirdly-large variety of backend and server technologies. So, it’s become incredibly important to me to be able to rapidly spin up disposable Linux web servers to test with. Seth clued me in to Linux Containers (LXC) for this:
LXC provides operating system-level virtualization not via a full blown virtual machine, but rather provides a virtual environment that has its own process and network space. LXC relies on the Linux kernel cgroups functionality that became available in version 2.6.24, developed as part of LXC. … It is used by Heroku to provide separation between their “dynos.”
I use a Mac, so I’m running these under Virtualbox. I move around between a number of different networks, so each server container had to have a no-hassle network connection. I’m also impatient, so I really needed to be able to clone these in seconds and have them ready to use.
This is a guide for creating an Ubuntu Linux virtual machine under Virtualbox to host individual containers with simple two-way network connectivity. You’ll be able to clone a container with a single command, and connect to it using a simple <container>.local host name.
The Linux Host
First, download an Ubuntu ISO. I try to stick to the long-term support releases, so I’m using Ubuntu 12.04 here. Get a copy of Virtualbox, also free.
Create a new Virtualbox virtual machine to boot from the Ubuntu installation ISO. For a root volume, I selected the VDI format with a size of 32GB. The disk image will expand as it’s allocated, so it won’t take up all that space right away. I manually created three partitions on the volume:
- 4.0 GB ext4 primary.
- 512 MB swap, matching RAM size. Could use more.
- All remaining space btrfs, mounted at /var/lib/lxc.
Btrfs (B-tree file system, pronounced “Butter F S”, “Butterfuss”, “Better F S”, or “B-tree F S") is a GPL-licensed experimental copy-on-write file system. It will allow our cloned containers to occupy only as much disk space as is changed, which will decrease the overall file size of the virtual machine.
During the OS installation process, you’ll need to select a host name. I used “ubuntu-demo” for this demonstration.
Host Linux Networking
Boot into Linux. I started by installing some basics, for me: git, vim, tcsh, screen, htop, and etckeeper.
Set up /etc/network/interfaces with two bridges for eth0 and eth1, both DHCP. Note that eth0 and eth1 must be commented-out, as in this sample part of my /etc/network/interfaces:
## The primary network interface
#auto eth0
#iface eth0 inet dhcp

auto br0
iface br0 inet dhcp
        dns-nameservers 8.8.8.8
        bridge_ports eth0
        bridge_fd 0
        bridge_maxwait 0

auto br1
iface br1 inet dhcp
        bridge_ports eth1
        bridge_fd 0
        bridge_maxwait 0
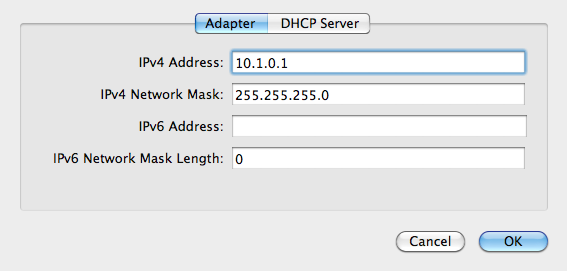
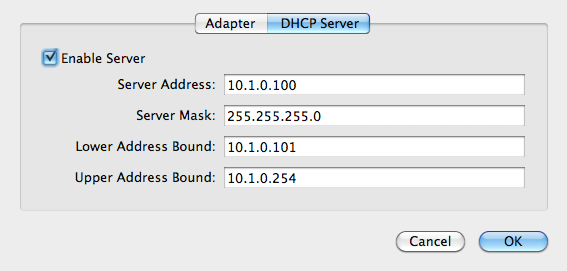
Back in Virtualbox preferencese, create a new network adapter and call it “vboxnet0”. My settings are 10.1.0.1, 255.255.255.0, with DHCP turned on.
Shut down the Linux host, and add the secondary interface in Virtual box. Choose host-only networking, the vboxnet0 adapter, and “Allow All” promiscuous mode so that the containers can see inbound network traffic.
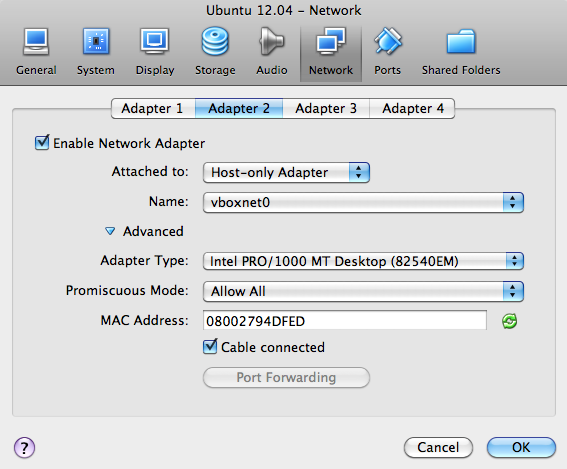
The primary interface will be NAT by default, which will carry normal out-bound internet traffic.
- Adapter 1: NAT (default)
- Adapter 2: Host-Only vboxnet0
Start up the Linux host again, and you should now be able to ping the outside world.
% ping 8.8.8.8

PING 8.8.8.8 (8.8.8.8) 56(84) bytes of data.
64 bytes from 8.8.8.8: icmp_req=1 ttl=63 time=340 ms
…
Use ifconfig to find your Linux IP address (mine is 10.1.0.2), and try ssh’ing to that address from your Mac command line with the username you chose during initial Ubuntu installation.
% ifconfig br1

br1       Link encap:Ethernet  HWaddr 08:00:27:94:df:ed
          inet addr:10.1.0.2  Bcast:10.1.0.255  Mask:255.255.255.0
          inet6 addr: …
Next, we’ll set up Avahi to broadcast host names so we don’t need to remember DHCP-assigned IP addresses. On the Linux host, install avahi-daemon:
% apt-get install avahi-daemon
In the configuration file /etc/avahi/avahi-daemon.conf, change these lines to clarify that our host names need only work on the second, host-only network adapter:
allow-interfaces=br1,eth1
deny-interfaces=br0,eth0,lxcbr0
Then restart Avahi.
% sudo service avahi-daemon restart
Now, you should be able to ping and ssh to ubuntu-demo.local from within the virtual machine and your Mac command line.
No Guest Containers
So far, we have a Linux virtual machine with a reliable two-way network connection that’s resilient to external network failures, available via a meaningful host name, and with a slightly funny disk setup. You could stop here, skipping the LXC steps and use Virtualbox’s built-in cloning functionality or something like Vagrant to set up fresh development environments. I’m going to keep going and set up LXC.
Linux Guest Containers
Install LXC.
% sudo apt-get lxc
Initial LXC setup uses templates, and on Ubuntu there are several useful ones that come with the package. You can find them under /usr/lib/lxc/templates; I have templates for ubuntu, fedora, debian, opensuse, and other popular Linux distributions. To create a new container called “base” use lxc-create with a chosen template.
% sudo lxc-create -n base -t ubuntu
This takes a few minutes, because it needs retrieve a bunch of packages for a minimal Ubuntu system. You’ll see this message at some point:
##
# The default user is 'ubuntu' with password 'ubuntu'!
# Use the 'sudo' command to run tasks as root in the container.
##
Without starting the container, modify its network adapters to match the two we set up earlier. Edit the top of /var/lib/lxc/base/config to look something like this:
lxc.network.type=veth
lxc.network.link=br0
lxc.network.flags=up
lxc.network.hwaddr = 00:16:3e:c2:9d:71

lxc.network.type=veth
lxc.network.link=br1
lxc.network.flags=up
lxc.network.hwaddr = 00:16:3e:c2:9d:72
An initial MAC address will be randomly generated for you under lxc.network.hwaddr, just make sure that the second one is different.
Modify the container’s network interfaces by editing /var/lib/lxc/base/rootfs/etc/network/interfaces (/var/lib/lxc/base/rootfs is the root filesystem of the new container) to look like this:
auto eth0
iface eth0 inet dhcp
        dns-nameservers 8.8.8.8

auto eth1
iface eth1 inet dhcp
Now your container knows about two network adapters, and they have been bridged to the Linux host OS virtual machine NAT and host-only adapters. Start your new container:
% sudo lxc-start -n base
You’ll see a normal Linux login screen at first, use the default username and password “ubuntu” and “ubuntu” from above. The system starts out with minimal packages. Install a few so you can get around, and include language-pack-en so you don’t get a bunch of annoying character set warnings:
% sudo apt-get install language-pack-en
% sudo apt-get install git vim tcsh screen htop etckeeper
% sudo apt-get install avahi-daemon
Make a similar change to the /etc/avahi/avahi-daemon.conf as above:
allow-interfaces=eth1
deny-interfaces=eth0
Shut down to return to the Linux host OS.
% sudo shutdown -h now
Now, restart the container with all the above modifications, in daemon mode.
% sudo lxc-start -d -n base
After it’s started up, you should be able to ping and ssh to base.local from your Linux host OS and your Mac.
% ssh ubuntu@base.local
Cloning a Container
Finally, we will clone the base container. If you’re curious about the effects of Btrfs, check the overall disk usage of the /var/lib/lxc volume where the containers are stored:
% df -h /var/lib/lxc

Filesystem      Size  Used Avail Use% Mounted on
/dev/sda3        28G  572M   26G   3% /var/lib/lxc
Clone the base container to a new one, called “clone”.
% sudo lxc-clone -o base -n clone
Look at the disk usage again, and you will see that it’s not grown by much.
% df -h /var/lib/lxc

Filesystem      Size  Used Avail Use% Mounted on
/dev/sda3        28G  573M   26G   3% /var/lib/lxc
If you actually look at the disk usage of the individual container directories, you’ll see that Btrfs is allowing 1.1GB of files to live in just 573MB of space, representing the repeating base files between the two containers.
% sudo du -sch /var/lib/lxc/*

560M	/var/lib/lxc/base
560M	/var/lib/lxc/clone
1.1G	total
You can now start the new clone container, connect to it and begin making changes.
% sudo lxc-start -d -n clone
% ssh ubuntu@clone.local
Conclusion
I have been using this setup for the past few weeks, currently with a half-dozen containers that I use for a variety of jobs: testing TileStache, installing Rails applications with RVM, serving Postgres data, and checking out new packages. One drawback that I have encountered is that as the disk image grows, my nightly time machine backups grow considerably. The Mac host OS can only see the Linux disk image as a single file.
On the other hand, having ready access to a variety of local Linux environments has been a boon to my ability to quickly try out ideas. Special thanks again to Seth for helping me work through some of the networking ugliness.
Further Reading
Tao of Mac has an article on a similar, but slightly different Virtualbox and LXC setup. They don’t include the promiscuous mode setting for the second network adapter, which I think is why they advise using Avahi and port forwarding to connect to the machine. I believe my way here might be easier.
Shift describes a Vagrant and LXC setup that skips Avahi and uses a plain hostnames for internal connectivity.
subscribe to ![]() this site.
|
contact Michal Migurski
this site.
|
contact Michal Migurski
Comments
Sorry, no new comments on old posts.